Showing posts with label Bread. Show all posts

2014-10-03

New Chérie Kelly Website! www.cheriekelly.co.uk

If you are following my facebook or instagram, you would know I have made a new logo and website! It has been a bit more than 2 years since I started Chérie Kelly here in blogger, I first started blogging about making cakes and pâtisseries as a hobby, later found my strong interest in sugarcraft cake decorating, and lately extended my passion to flower arrangements!

I was sorting out the images for my new website's gallery, I realised I have got such a large varieties of cakes portfolio - thank you so much for all your support! I felt like it was about time to give a new and more professional look to my site, as well as to include "flowers" to Chérie Kelly!

All updates and blog posts are moved, please visit and bookmark my new website www.cheriekelly.co.uk , oh and please follow me on facebook or instagram :)

New Chérie Kelly Website! www.cheriekelly.co.uk
See you there xoxo


2014-09-02

Animal Baked Doughnuts (not fried)

I have been seeing some cute Japanese doughnuts in animal-shaped in the internet, they are so cute and adorable, I didnt manage to find them when I was in Tokyo last December, so I gave it a go to make them myself! :-D These doughnuts are baked, a healthier option to deep frying them. I made the white ones as rabbits and the brown ones as bears, my sister thinks they look alike though :-O


Cherie Kelly's Bear and Rabbit Animal Baked Doughnuts (Not Fried)

Cherie Kelly's Bear and Rabbit Animal Baked Doughnuts (Not Fried)


Japanese Animal Baked Doughnuts

makes around 8-10 doughnuts

Ingredients

For the doughnuts

1/2 egg
80ml milk
30g sugar
120g bread flour
40g plain flour
4g instant dry yeast
4g salt
10g unsalted butter, softened in room temperature

For the decoration

a handful of almond/almond flakes, for the ears
75g white chocolate
75g milk chocolate
10g dark chocolate, for the faces

Utensils

a round cookie cutter with diameter 7cm
a round piping nozzle with diameter 3cm
can be substituted with similar round shaped tool like a small glass or just use a knife to cut out the shapes

Methods

1. In a small bowl, whisk egg and sugar together, mix in the milk.
2. Put the bread flour, plain flour, dry yeast and salt in a separate large mixing bowl, slowly add the egg mixture in, mix on slow speed with an electric dough hook.

3. Gradually beat in the butter, mix on medium-high speed for 5 mins.
4. Take the dough out onto a lightly floured work surface, knead and round the dough until the top is smooth.
5. Put the dough into a large lightly floured bowl, spray some water onto the dough and wrap the bowl with cling film.
Leave the dough to rise for about 1-2 hours until doubled in size.

6. For the dough to rise the second time. Take the dough out and place it on a lightly floured work surface, knock out the air bubble, knead and fold over the dough.
7. Put the dough into a large lightly floured bowl and wrap the bowl with wet towel. Leave the dough to rise for about 1 hour.
8. Line a baking tray with baking paper.
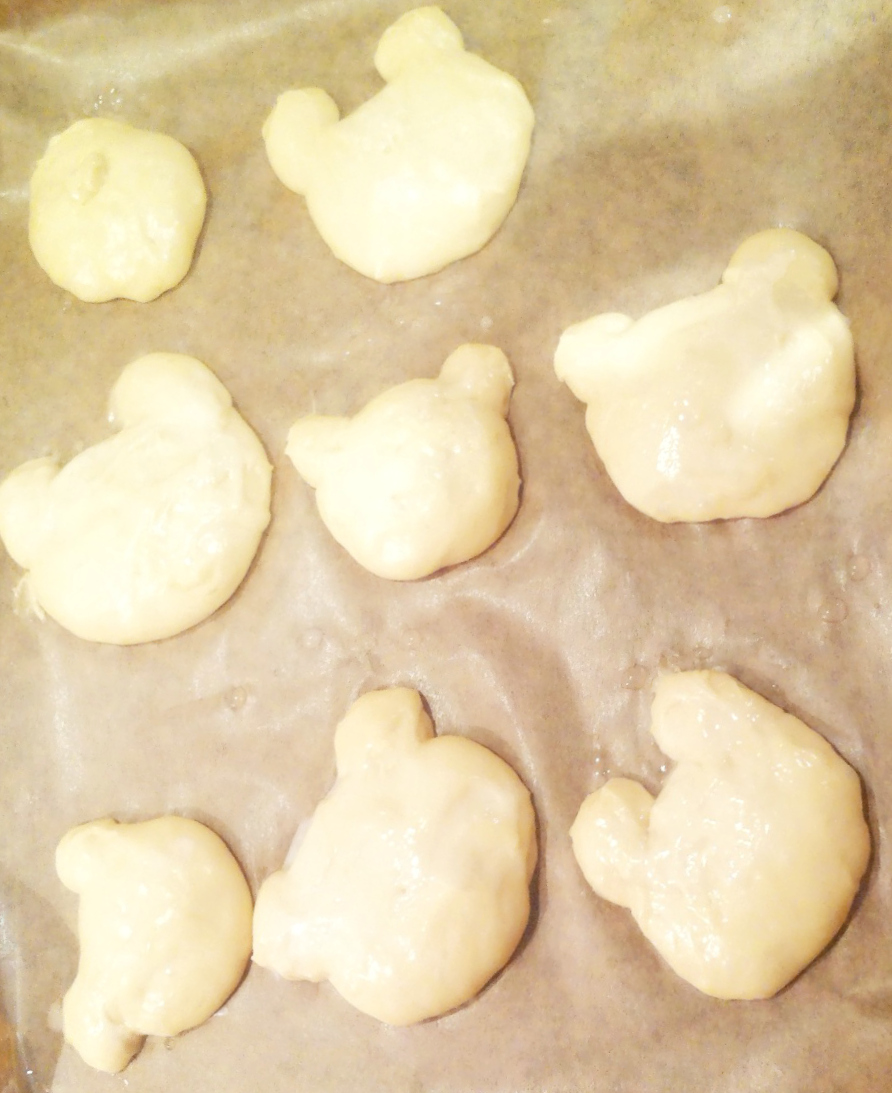
9. Roll the dough into 1.5cm thickness, use the cookie cutter and nozzle to cut into rounds of doughnut shapes.

10. Line them onto the baking tray, cover the tray with cling film and let them rise for 1 hour until the doughnuts doubled in size.

11. Preheat the oven to 180C. Bake in the oven for 15 mins until they turn light golden-brown. Cool on a wire rack.
12. Melt the chocolate seperately, stir and let it cool to 29C or until it doesnt drip so quickly from a spoon.
13. Dip one side of the cooled doughnut into the white/milk chocolate, push in 2 pieces of almond flakes as the ears and gently dip the ears part into the chocolate again. Pipe the eyes and mouth with the dark chocolate. Repeat for the rest of the doughnuts.
Cherie Kelly's Bear and Rabbit Animal Baked Doughnuts (Not Fried)


Cherie Kelly's Bear and Rabbit Animal Baked Doughnuts (Not Fried)


2014-08-30

Rosemary and Sun-dried Tomato Italian Focaccia ♡


After watching the contestants making ciabatta and bread knots in the bread episode of The Great British Bake Off , I wanted to bake some Italian bread too! Focaccia came to my mind as it is my favourite and the toppings can be varied :)
Cherie Kelly's Rosemary and Sun-dried Tomato Italian Focaccia

Rosemary and Sun-dried Tomato Italian Focaccia

makes 2 flatbreads

Ingredients

For the Foccacia

500g bread flour
15g salt
14g instant dry yeast
400ml cold water
40ml olive oil

For the herb olive oil mix

a few bunches of fresh Rosemary
125g sun-dried tomato, chopped
125g pitted olives, chopped
3 cloves of garlic, sliced
2 shallot, sliced
a pinch of sea salt
a pinch of pepper
olive oil

Methods

For the Foccacia

1. Put the bread flour, salt and dry yeast in a large mixing bowl, slowly add half of the water and olive oil, mix on slow speed with the dough hook attachment of the stand mixer. Gradually add the remaining water and olive oil, mix on medium-high speed for 5 mins.
2. Take the dough out onto an oiled work surface, knead and round the dough until the top is smooth.
3. Put the dough into a large lightly floured bowl and wrap the bowl with cling film.

Leave the dough to rise for about 1-2 hours until doubled in size.

4. Take the dough out and place it on a lightly oiled work surface, knock back the air bubble and fold over the dough.
5. Line two baking trays with baking paper. Divide the dough into two portions, roll each portion into a square/rectangle shape and place it in the tray. Cover and leave to prove for 1-2 hours.


For the herb olive oil mix

6. In the meantime, prepare the herb and olive oil mix by putting all the herbs and seasoning in a small saucepan, warm them up with the olive oil. Turn off the heat and let the oil mixture sit and infuse for 15 mins.
Cherie Kelly's Rosemary and Sun-dried Tomato Italian Focaccia


7. Preheat the oven to 200C.
8. Press some holes in the dough.
 Sprinkle the herb and olive oil mixture over the Focaccia.
Cherie Kelly's Rosemary and Sun-dried Tomato Italian Focaccia

9. Bake in the oven for 20-25 mins until the Focaccia is golden-brown. Serve hot or cold :)
Cherie Kelly's Rosemary and Sun-dried Tomato Italian Focaccia


2014-02-05

❤ A Little Treat for You ❤

If you are reading this, I believe we enjoy doing something similar - baking and cake decorating! I would also like to thank you for visiting this space, here is a little gift for you - a discount voucher to shop in Cake Craft World  ❤ which of course you can share with your friends and family : )

Cake Craft World Discount Voucher

They do a very wide range of items, from piping bags, nozzles, cupcake cases to food colouring gels, baking tins, fondant and all kind of baking and cake decorating tools. I get my supplies from them : ) you can order your items online, they do next day and international delivery : )

Have fun shopping and making cakes! & stay warm xoxo


2014-01-25

Japanese Bear and Rabbit Soft Bread Bun ♫

The bakeries in Japan do a lot of bread buns in animal shapes, they are all so creative and cute. I was up too early because of jetlag last Sunday, I decided to make some bread to kill my time! :-P I didnt prove/ferment my first bread (panda bread) quite right last time, I let my dough to prove/ferment next to the radiator this time and it rose much better ♪

Cherie Kelly's Japanese Bear and Rabbit Soft Bread Bun


Japanese Bear and Rabbit Soft Bread Bun

makes around 8-9 buns

Ingredients

175g White Bread (strong) flour
75g Plain flour
50g Sugar
1 tsp Salt
1 Egg, Whisked
100ml Water
3 tbsp Milk
10g Dry yeast
25g Unsalted Butter, at room temperature
Oil, to grease
20 melted chocolate, to decorate

Method

1. Place bread flour, plain flour, sugar and salt in a large bowl and mix well.
2. In a separate bowl, put in the whisked egg, water, milk and dry yeast, gently whisk until incorporated.
3. Add the milk mixture into the flour mixture and keep mixing until combined.
4. Start kneading by hand or by a mixer with a dough hook attachment for minimum 10-15 mins under high speed until the dough become smooth and elastic.
5. Knead the dough properly until it forms a thin, translucent film.

6. Add the butter and keep kneading for another 10 mins until a strong gluten film forms.
7. Knead the dough into a ball, place the dough in a lightly oiled bowl, cover the bowl with cling film.

8. Leave to rise (1st rising) for 1-2 hours or until doubled in size.

9. Remove risen dough from the bowl, punch down and turn out onto a lightly floured surface.
10. Divide the dough into 9 pieces, form the first 8 dough into rounds, use the 9th dough to form some smaller rounds as ears and stick them to the larger rounds.

11. Cover with cling film and let rise (2nd rising) at room temperature for about 40-45 minutes, or until doubled in size.
12. Preheat the oven to 180C, place the dough on a baking sheet, lower the temperature to 160C and bake for 10 minutes, lower the temperature again to 130C and bake for another 5-10 minutes.

13. Remove and cool them on a wire rack. Pipe some melted chocolate as ears and mouth to finish.
Cherie Kelly's Japanese Bear and Rabbit Soft Bread Bun

I am very pleased with my second bread-making result, the buns turned out very soft and springy :) they stayed fluffy even after a few days.
Cherie Kelly's Japanese Bear and Rabbit Soft Bread Bun

Next time I will try to make some savoury ones or with fillings like those I saw in Tokyo :))))


2013-02-18

Cheese and Olive Brazilian Bread (Pão de Queijo)

When the waiters bring the table a basket of bread to choose from in restaurants, I always pick those with olive or cheese, they are so much nicer than the plain or brown ones :-P I have been finding some simple recipes of bread, as I still think making bread is so complicated... this Cheese and Olive Brazilian Bread is just prefect - easy to make, no proofing required, smell was sooooo fragrant, crispy outside, soft and chewy inside, yummm yummm ♥

Cherie Kelly's Cheese and Olive Brazilian Bread


Cheese and Olive Bread

makes 24 cheesy balls

Ingredients

600g tapioca flour
20g salt
1 tbsp garlic granules
40g butter
80ml oil
500ml milk
5 eggs
150g chopped olives
350g Parmesan Cheese

Methods

1. Preheat oven to 180°C. Grease 12 holes muffin tin.
2. Put tapioca flour, salt and garlic granules in a large bowl.
3. Place butter, oil and milk in a saucepan over medium heat and simmer.
4. Remove from heat once it starts to boil, pour the liquid slowly over the mixture of flour and salt.
5. Place the hook attachments to the mixer and beat until the mixture cool down completely.

6. Mix in the eggs until incorporated, add the chopped olives and cheese.

7. Gently pour the mixture into the muffin trays until 3/4 full.

8. Bake for 35 minutes until puffed and golden, test by inserting a skewer into the centre of the bread, it should come out clean.
Cherie Kelly's Cheese and Olive Brazilian Bread

9. Serve warm : )


2012-07-26

Panda Bread

My colleagues from work make very nice professional Italian bread, they bring me some to try every now and then, I am so impressed because they taste so much softer and fresher than those you buy from bakery shops. I thought it shouldnt be too difficult to make like those baking programs on tv, I was so curious to try to make my own, then I realized making bread do require some skills! it was very fun though with all sticky hands :-P especially I picked this cute panda bread recipe from Not Quite Nigella which I have been eyeing on for a while.
Cherie Kelly's Panda Bread

Cherie Kelly's Panda Bread

Recipe adapted from Not Quite Nigella 


Panda Bread

Ingredients: 

Makes approximately 600g/21ozs loaf (206mm x 108mm x100mm high)

270g/9.5ozs all purpose flour
30g/1oz cornflour
30g/1oz sugar
Milk + 1 egg yolk = 21 0g/7.4ozs
4.5g/0.18ozs salt
20g/0.7 ozs unsalted butter (I used 20g)
4g/0.14ozs yeast
8g/0.28ozs green tea powder dissolved in 2 tablespoons boiling hot water
8g/0.28ozs cocoa powder dissolved in 2 tablespoons boiling water

Method:

1. Heat up milk and yolk to temperature of 38℃/100F. (I beat the yolk lightly with milk and send it to the microwave on High for 30 seconds).

2. Place flours, salt, yeast, sugar in an electric mixer fitted with a Dough Hook and set on low setting to combine. Then add milk and egg mixture and softened butter and knead on low setting for 5-6 minutes until elastic.

3. Divide dough (about 560g or just over 1 pound) into 3 parts: 75g/2.64ozs for the chocolate, 210g/7.4ozs plain and the rest of the dough which is less than 280g/9.8ozs for the green tea.

4. Add chocolate to the 75g/2.64ozs dough and knead till the colour is even. Add green tea mixture to the 280g/9.8ozs dough and knead till colour is even. If you do these manually, make sure that your hands and bench space where you need are cleaned between kneading to avoid transferring the colours.

5. Prove all 3 pieces of doughs on separate greased plates covered loosely with oiled cling wrap for 30 – 40 minutes.

6. Punch air out of dough and prove for another 20 – 30 minutes.

7. Use 90g/3ozs plain dough for the face and 2 pieces of 27g/1oz chocolate dough for the eyes.

8. Fill the hollow of the eyes with 30g/1oz plain dough.

9. Roll remaining plain dough over the patterned dough.

10. Divide the remaining chocolate dough into 2 pieces (17.5g each/0.61ozs) for the ears.

11. Use 70g/2.47ozs of the green tea dough to fill up the hollow between the ears.

12. Wrap the rest of the green tea dough all around the patterned dough.

13. Place dough into a well-greased loaf pan and cover it with a lid and prove for 50 – 60 minutes in an enclosed are. As it’s cold here and we’re in the middle of Winter, I set the pan in a larger container filled with warm water and refreshed the water with hot water 3-4 times to make sure that it rose.