2014-10-03

New Chérie Kelly Website! www.cheriekelly.co.uk

If you are following my facebook or instagram, you would know I have made a new logo and website! It has been a bit more than 2 years since I started Chérie Kelly here in blogger, I first started blogging about making cakes and pâtisseries as a hobby, later found my strong interest in sugarcraft cake decorating, and lately extended my passion to flower arrangements!

I was sorting out the images for my new website's gallery, I realised I have got such a large varieties of cakes portfolio - thank you so much for all your support! I felt like it was about time to give a new and more professional look to my site, as well as to include "flowers" to Chérie Kelly!

All updates and blog posts are moved, please visit and bookmark my new website www.cheriekelly.co.uk , oh and please follow me on facebook or instagram :)

New Chérie Kelly Website! www.cheriekelly.co.uk
See you there xoxo


2014-09-11

Orange Hermès Birkin Handbag Cake with a pair of Chanel Pearl Earrings

How sweet it is when a husband plans a surprise birthday party for his wife, I love the idea Tim had to surprise his wife with an orange Hermès Birkin Handbag Cake with a pair of Chanel Pearl Earrings and jewel box on the side as decoration. It is chocolate sponge and chocolate buttercream inside the  handbag cake, this time I used a leather impression mat to emboss the leather texture on the fondant, the texture is more obvious in real than from the picture :)

Cherie Kelly's Orange Hermès Birkin Handbag Cake with a pair of Chanel Pearl Earrings


2014-09-06

中秋節兔子燈籠 Rabbit Lantern Macarons

"Falling on the 15th day of the 8th month according to the Chinese lunar calendar, the Mid-Autumn Festival is the second grandest festival after the Spring Festival in China. It takes its name from the fact that it is always celebrated in the middle of the autumn season. The day is also known as the Moon Festival, as at that time of the year the moon is at its roundest and brightest. Many traditional and meaningful celebrations are widely held, like having dinner with family, making mooncakes, and lighting up lanterns Families will sit together and contemplate the moon, savoring the company of those around them and thinking of relatives or loved ones in far away places.."
Instead of making some snowskin mooncake I originally planned for this year's Moon/Mid-Autumn Festival, (I forgot to order the mooncake mould on time..and my parents got me too much mooncake..) I made and decorated some macarons in the shape of tradional rabbit lanterns :)

Wish you and your family a happy Mid-Autumn Festival 中秋節快樂 !
Cherie Kelly's 中秋節兔子燈籠 Rabbit Lantern Macarons


Inspiration from this tradional rabbit lantern:

中秋節兔子燈籠 Rabbit Lantern Macarons

Ingredients

For the macaron shells 

(makes around 12 sandwiched macarons)
90g grounded almond
120g icing sugar
a pinch of salt
75g aged egg whites
1/2 teaspoon egg white powder
75g sugar


For the hazelnut ganache

100g dark chocolate
100g hazelnut praline paste or Nutella
90g whipping cream

For decoration

1 egg white
225g icing sugar
1 tsp lemon juice
pink, yellow, green and black food colouring

Utensils

2cm plain nozzle
0.5cm plain nozzle
silicone baking mat / baking paper

Methods

To make macaron shells

1. Put the grounded almond, icing sugar and salt in a food processor, pulse several times for a few seconds each to combine them. Sift them into a large bowl and set aside.
2. Whisk together the egg white and egg white powder on medium speed until soft peak.
3. Add the sugar gradually and keep whisking until the meringue is glossy and stiff. Add in the food colouring.
4. Fold the dry ingredients quickly into the meringue with a spatula, try to fold as less strokes as possible and avoid over-fold the mixture.

5. Spoon the 95% of the mixture into a piping bag fitted with a 2cm plain nozzle and pipe the rabbit bodies onto parchment paper. You can print out and use this rabbit macarons piping template onto a A4 paper for your guide.
Cherie Kelly's 兔子燈籠 rabbit macarons piping template
6. Put the remaining 5% of the mixture into a piping bag fitted with a small 0.5cm plain nozzle and pipe the ears and tails touching the edge on the bodies onto parchment paper. Remove the template.
7. Set aside for about 30 minutes or until a skin forms that does not stick onto your finger.
8. Bake the macarons on the lowest shelf in preheated oven between 160 degree for 15 mintues, rotate the tray 180 degree half-way during baking.
9. Remove the macaron shells from the oven and tray, place the parchment onto the work surface and let cool completely before removing the shells.
Cherie Kelly's 中秋節兔子燈籠 Rabbit Lantern Macarons


To make the hazelnut ganache 

1. Break the chocolate into pieces and put into a bowl. Send to the microwave to melt for 60 seconds and stir until the chocolate completely melted.
2. Boil the cream and pour about a third at a time onto the melted chocolate, keep mixing and add in the hazelnut praline paste or Nutella until well combined.
3. Allow the ganache mixture to cool. Press clingfilm onto the surface of the ganache and refrigerate until thick enough to pipe.

To make the royal icing

1. Put the egg white in a grease-free mixing bowl, beat with a hand-held electric mixer until frothy.
2. Add in icing sugar gradually, beat on high speed, add in lemon juice, and whisk until icing is very thick and glossy, about 5 minutes.
3. Divide into a few bowls for different colour, add food coloring and mix well with a teaspoon.
4. Fill the different coloured royal icing in different piping bags.

To assemble the macarons

1. Spoon the ganache into a pastry bag fitted with a 1cm plain tip. Pipe a generous round onto a shell, then top with another shell, twisting lightly so that the filling spreads and bulges enticingly.
2. Gently pipe some royal icing or melted chocolate for the rabbits' eyes and body decoration.
3. Store the macarons covered in the fridge for at least 24 hours to allow the inside of the macaron shells to soften.
4. Bring back to room temperature before serving.
Cherie Kelly's 中秋節兔子燈籠 Rabbit Lantern Macarons

Cherie Kelly's 中秋節兔子燈籠 Rabbit Lantern Macarons


2014-09-02

Animal Baked Doughnuts (not fried)

I have been seeing some cute Japanese doughnuts in animal-shaped in the internet, they are so cute and adorable, I didnt manage to find them when I was in Tokyo last December, so I gave it a go to make them myself! :-D These doughnuts are baked, a healthier option to deep frying them. I made the white ones as rabbits and the brown ones as bears, my sister thinks they look alike though :-O


Cherie Kelly's Bear and Rabbit Animal Baked Doughnuts (Not Fried)

Cherie Kelly's Bear and Rabbit Animal Baked Doughnuts (Not Fried)


Japanese Animal Baked Doughnuts

makes around 8-10 doughnuts

Ingredients

For the doughnuts

1/2 egg
80ml milk
30g sugar
120g bread flour
40g plain flour
4g instant dry yeast
4g salt
10g unsalted butter, softened in room temperature

For the decoration

a handful of almond/almond flakes, for the ears
75g white chocolate
75g milk chocolate
10g dark chocolate, for the faces

Utensils

a round cookie cutter with diameter 7cm
a round piping nozzle with diameter 3cm
can be substituted with similar round shaped tool like a small glass or just use a knife to cut out the shapes

Methods

1. In a small bowl, whisk egg and sugar together, mix in the milk.
2. Put the bread flour, plain flour, dry yeast and salt in a separate large mixing bowl, slowly add the egg mixture in, mix on slow speed with an electric dough hook.

3. Gradually beat in the butter, mix on medium-high speed for 5 mins.
4. Take the dough out onto a lightly floured work surface, knead and round the dough until the top is smooth.
5. Put the dough into a large lightly floured bowl, spray some water onto the dough and wrap the bowl with cling film.
Leave the dough to rise for about 1-2 hours until doubled in size.

6. For the dough to rise the second time. Take the dough out and place it on a lightly floured work surface, knock out the air bubble, knead and fold over the dough.
7. Put the dough into a large lightly floured bowl and wrap the bowl with wet towel. Leave the dough to rise for about 1 hour.
8. Line a baking tray with baking paper.
9. Roll the dough into 1.5cm thickness, use the cookie cutter and nozzle to cut into rounds of doughnut shapes.

10. Line them onto the baking tray, cover the tray with cling film and let them rise for 1 hour until the doughnuts doubled in size.

11. Preheat the oven to 180C. Bake in the oven for 15 mins until they turn light golden-brown. Cool on a wire rack.
12. Melt the chocolate seperately, stir and let it cool to 29C or until it doesnt drip so quickly from a spoon.
13. Dip one side of the cooled doughnut into the white/milk chocolate, push in 2 pieces of almond flakes as the ears and gently dip the ears part into the chocolate again. Pipe the eyes and mouth with the dark chocolate. Repeat for the rest of the doughnuts.
Cherie Kelly's Bear and Rabbit Animal Baked Doughnuts (Not Fried)


Cherie Kelly's Bear and Rabbit Animal Baked Doughnuts (Not Fried)


2014-08-30

Rosemary and Sun-dried Tomato Italian Focaccia ♡


After watching the contestants making ciabatta and bread knots in the bread episode of The Great British Bake Off , I wanted to bake some Italian bread too! Focaccia came to my mind as it is my favourite and the toppings can be varied :)
Cherie Kelly's Rosemary and Sun-dried Tomato Italian Focaccia

Rosemary and Sun-dried Tomato Italian Focaccia

makes 2 flatbreads

Ingredients

For the Foccacia

500g bread flour
15g salt
14g instant dry yeast
400ml cold water
40ml olive oil

For the herb olive oil mix

a few bunches of fresh Rosemary
125g sun-dried tomato, chopped
125g pitted olives, chopped
3 cloves of garlic, sliced
2 shallot, sliced
a pinch of sea salt
a pinch of pepper
olive oil

Methods

For the Foccacia

1. Put the bread flour, salt and dry yeast in a large mixing bowl, slowly add half of the water and olive oil, mix on slow speed with the dough hook attachment of the stand mixer. Gradually add the remaining water and olive oil, mix on medium-high speed for 5 mins.
2. Take the dough out onto an oiled work surface, knead and round the dough until the top is smooth.
3. Put the dough into a large lightly floured bowl and wrap the bowl with cling film.

Leave the dough to rise for about 1-2 hours until doubled in size.

4. Take the dough out and place it on a lightly oiled work surface, knock back the air bubble and fold over the dough.
5. Line two baking trays with baking paper. Divide the dough into two portions, roll each portion into a square/rectangle shape and place it in the tray. Cover and leave to prove for 1-2 hours.


For the herb olive oil mix

6. In the meantime, prepare the herb and olive oil mix by putting all the herbs and seasoning in a small saucepan, warm them up with the olive oil. Turn off the heat and let the oil mixture sit and infuse for 15 mins.
Cherie Kelly's Rosemary and Sun-dried Tomato Italian Focaccia


7. Preheat the oven to 200C.
8. Press some holes in the dough.
 Sprinkle the herb and olive oil mixture over the Focaccia.
Cherie Kelly's Rosemary and Sun-dried Tomato Italian Focaccia

9. Bake in the oven for 20-25 mins until the Focaccia is golden-brown. Serve hot or cold :)
Cherie Kelly's Rosemary and Sun-dried Tomato Italian Focaccia


2014-08-24

Totoro Cake

I am back! Hope you all are well and had a enjoyable long summer. Apart from holidays and family visiting, I havent stopped baking and cake decorating :) time has been spent on cake making than blogging, there are a lot to catchup! :)

My dear friend Emma loves the Japanese cartoon character Totoro from My Neighbor Totoro となりのトトロ, here was a cake I made for her birthday party a while ago, it was a mocha buttercream chocolate cake.

Cherie Kelly's Totoro Cake


Our friend Wing took a funny picture of him having birthday candles on his head! lol :-D
Cherie Kelly's Totoro Cake
Photo Credit: Wing Hym Liu


2014-05-22

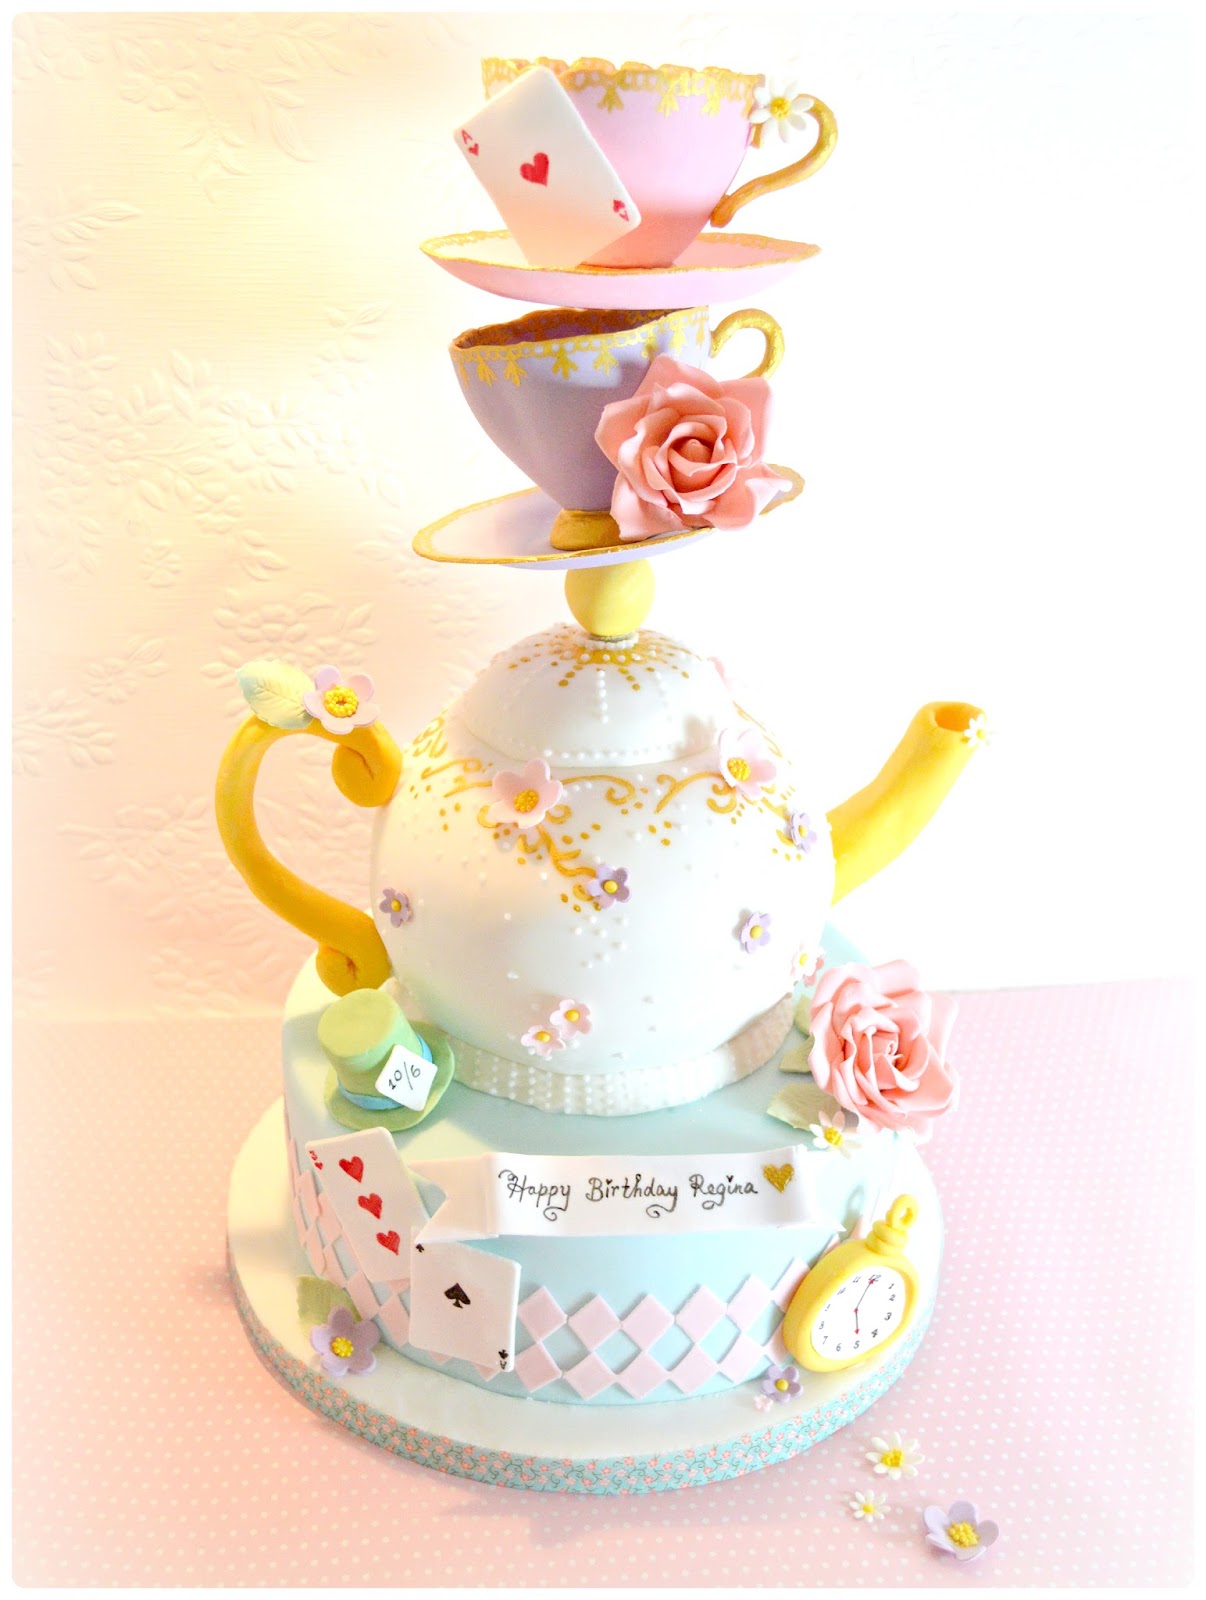
Topsy Turvy Mad Hatter Teapot and Teacups Cake ♠ ♥ ♣ ♦

Sorry for not blogging recently, if you are following my instragram you know I got distracted :-P I will tell you more about it in the next posts :) This was the Topsy Turvy Mad Hatter Teapot and Teacups Cake I made for Regina's birthday a few weeks ago, I was very delighted to be able to make the teacups stand on the teapot :) which matched up with the birthday girl's "Mad Hatter" themed afternoon tea party.

The cake inside the teapot and bottom tier was red velvet with cream cheese buttercream filling,
Cherie Kelly's Topsy Turvy Mad Hatter Teapot and Teacups Cake

the teacups and decorations were made of fondant/sugarpaste icing, all edible :)
Cherie Kelly's Topsy Turvy Mad Hatter Teapot and Teacups Cake

Cherie Kelly's Topsy Turvy Mad Hatter Teapot and Teacups Cake

Cherie Kelly's Topsy Turvy Mad Hatter Teapot and Teacups Cake

 I love the teacups, I want to make mini ones next time as cupcake toppers :)
Cherie Kelly's Topsy Turvy Mad Hatter Teapot and Teacups Cake

An afternoon tea birthday party with a Mad Hatter Teapot Cake - such a great idea Regina got! xxx
Cherie Kelly's Topsy Turvy Mad Hatter Teapot and Teacups Cake


2014-05-10

Engagement Party Dessert Table

Designing and making dessert table platters is so fun especially as there are several different elements, they look cute and pretty when they are put together. I was honoured to make this dessert table for my dear friend's engagement party. With coconut pineapple cake, mini spring fruit tarts, pistachio and chocolate macarons, passionfruit gelee and strawberry mousse with coconut panna cotta mini dessert pods. 

The coconut pineapple cake was decorated with some swirly rustic frosting and sugar peony. I like the mini dessert pods in different coloured layers :). The mini tarts were with creme patissiere filling which was the best match with the spring fruits and tarts. The most popular macarons were the pistachio and chocolate flavours. 

 Congratulations to the sweet couples, I am so happy about their engagement xxx


2014-05-06

Mini Bunny Deco Japanese Sponge Roll Cake

This is another cute thing I wanted to try for a long time - to get smiley face on a roll cake! :-D this is really fun, you can also make hearts, polka dots or stripes pattern on it.

Cherie Kelly's Bunny Deco Japanese Sponge Roll Cake

Mini Bunny Deco Japanese Soufflé Roll Cake

Ingredients:

For the Sponge Cake

4 egg
75g caster sugar
3 tablespoon milk 
60g plain flour
butter to grease
1 tablespoon of cocoa powder
a few drop of raspberry fruit juice or pink food colouring

For the Filling abd Decoration

200ml double cream
3 tablespoon icing sugar
200g diced mango cubes (or fruits of your choice)
50g modelling white chocolate
50g modelling pink strawberry chocolate

Equipment

large baking tray
electric mixer
parchment paper
2 small piping bags

Method:

Sponge Cake

1. First draw up a 24cm x 30cm rectangle template of the smiley faces pattern on a large parchment paper. Measure and divide it into 8 smaller rectangles of  6cm x 15cm. Draw the smiley faces in the middle of each small rectangles, flip the paper, fold along the outer line into a large paper tray, fold and staple the corners together so the batter will not leak out of the paper tray. Put this paper tray onto the baking tray. Set aside.
Cherie Kelly's Bunny Deco Japanese Sponge Roll Cake

2.. Preheat the oven to 180C (350F).
3. Beat eggs and sugar with wire whisk in a metal bowl over a pan of hot water. 
4. Beat the batter on high speed for about 7 minutes until white and fluffy with an electric mixer. 
5. Add milk and fold together until combined.
6. Sift in flour and whisk for about 3 minutes on low speed to incorporate.
7. Take out 1 tablespoon of the batter and mix with the cocoa powder to form a chocolate paste, this will be used to pipe the features of the smiley faces. Put the paste into a small piping bag.
8. Take out another  tablespoon of the batter and mix with the raspberry fruit juice or pink food colouring to form a pink paste, this will be used to pipe the cheeks of the smiley faces. Put the paste into a small piping bag.
9. Pipe the features and cheeks on the paper according to the template drawn in Step 1.
Cherie Kelly's Bunny Deco Japanese Sponge Roll Cake

10. Bake for 2 mins and remove from oven. You can see the features are set.
Cherie Kelly's Bunny Deco Japanese Sponge Roll Cake

11. Spread the remaining batter in the baking tray and drop the tray lightly on the counter to raise the air bubbles out of the batter.
Cherie Kelly's Bunny Deco Japanese Sponge Roll Cake

12. Bake at 180C (350F) for 12 minutes till lightly brown. (cooking time may differ depend on the heat of the oven)
13. When it's done, drop the pan lightly to prevent shrinking. Remove the sponge cake from the pan by lifting the parchment paper and place it on a wire rack to cool. 
14. When it's cool enough, remove the parchment paper and place the sponge cake on the parchment paper with the brown side up.
Cherie Kelly's Bunny Deco Japanese Sponge Roll Cake

Filling and Decoration

1. Roll out the modelling chocolate into 0.5 mm thickness, use an oval cookie/petal cutter to cut oval shaped bunny ears. If you dont have modelling chocolate, you can melt the white and pink chocolate, draw ovals as ears and put them into the fridge until set.
Cherie Kelly's Bunny Deco Japanese Sponge Roll Cake

2. Whisk double cream and icing sugar on high speed in a bowl until it forms a soft peak.
3. Dice the fruits of your choice.
4. Cut the sponge into half along the template so we have 4 smiley faces in a vertical column.
Cherie Kelly's Bunny Deco Japanese Sponge Roll Cake

5. Coat the surface of the sponge cake evenly with the cream. Line the fruits in the middle over the creamed surface.
Cherie Kelly's Bunny Deco Japanese Sponge Roll Cake

4. Roll and wrap the cake in the parchment paper and put in a fridge for at least an hour to set. Repeat the same for the other half of the sponge cake.
Cherie Kelly's Bunny Deco Japanese Sponge Roll Cake

5. Remove the parchment paper.
Cherie Kelly's Bunny Deco Japanese Sponge Roll Cake

6. Cut them into individual portions.
Cherie Kelly's Bunny Deco Japanese Sponge Roll Cake

7. Decorate with the chocolate ears and enjoy!
Cherie Kelly's Bunny Deco Japanese Sponge Roll Cake