2012-07-31

Panna Cotta and Mango Mousse Domes

It has been quite gloomy in London even we are in the summer season, these Panna Cotta and Mango Mousse Domes can bring some colours to the rainy days.

Cherie Kelly's Panna Cotta and Mango Mousse Domes

Recipe modified and adapted from Tony Wong

Panna Cotta and Mango Mousse Domes


Make 6-7 domes or 12 small dessert glasses

Ingredients

Panna cotta

150g whipping cream
50g milk
33g granulated sugar
2 teaspoon of vanilla bean paste
2g leaf gelatine

Mango cubes

1 diced mango flesh
100g mango puree
2g leaf gelatine
25g granulated sugar

Mango Mousse

150g mango puree
4g leaf gelatine
10g granulated sugar
120g whipping cream

Mango Glaze

1 teaspoon of lemon juice
100g mango puree
4g leaf gelatine
2 teaspoons of granulated sugar

Method


For the Panna Cotta

1.       Bring whipping cream, milk, sugar and vanilla bean paste to boil.
2.       Remove from heat, add and stir softened gelatine until dissolved.
3.       Leave to cool. Pour the mixture through a sifter into small glasses or moulds.
4.       Chill in the fridge until set.

For the Mango Cubes

1.       Cut mango into small cubes.
2.       Boil half of the mango puree with the sugar until sugar is dissolved.
3.       Remove from heat, add and stir softened gelatine until dissolved.
4.       Mix in the other half of mango puree and mango cubes.
5.       Spoon the mango cubes on top of the panna cotta.
6.       Chill in the fridge until set.

For the Mango Mousse

1.       Boil half of the mango puree with the sugar until sugar is dissolved.
2.       Remove from heat, add and stir softened gelatine until dissolved.
3.       Mix in the other half of mango puree.
4.       Add whipped cream and stir well to light yellow mango mousse.
5.       Spoon on top of the mango cubes.
6.       Chill in the fridge until set.

For the Mango Glaze

1.       Boil half of the mango puree with the sugar until sugar is dissolved.
2.       Remove from heat, add and stir softened gelatine until dissolved.
3.       Mix in the other half of mango puree and lemon juice.
4.       Leave to cool. Meanwhile de-mould the panna cotta and mango mousse.
5.       Pour the mango glaze over. [Please see my older post to see a trick]
6.       Chill in the fridge until set. Decorate and enjoy.


2012-07-29

Matcha Green Tea Japanese Soufflé Roll Cake 抹茶ロールケーキ

When I was back to Hong Kong for holiday, I saw a very cute shop selling japanese roll cakes with different colours and flavours, I was surprised they were quite expensive for a slice even though they are easy to make with simple ingredients, my best friend from home asked if I could make the same, for sure it is a yes! :-D

Cherie Kelly's Matcha Green Tea Japanese Soufflé Roll Cake 抹茶ロールケーキ

Matcha Green Tea Japanese Soufflé Roll Cake 抹茶ロールケーキ

Ingredients:

For the Sponge Cake

3 egg
65g caster sugar
2 tablespoon milk 
45g plain flour
butter to grease
10g matcha green tea powder

For the Filling

150g double cream
3 tablespoon caster sugar
3 tablespoon matcha green tea powder
200g strawberries (or fruits of your choice)

Equipment

9-inch square brownie pan
electric mixer

Method:

Sponge Cake

1. Line the brownie pan with greased parchment paper. Preheat the oven to 180C (350F).
2. Beat eggs and sugar with wire whisk in a metal bowl over a pan of hot water. 
3. Beat the batter on high speed for about 7 minutes until white and fluffy with an electric mixer. 
4. Add milk and fold together until combined.
5. Sift in flour, dried strawberries, pink colouring and whisk for about 3 minutes on low speed to incorporate.
6. Spread the batter in the brownie pan and drop the pan lightly on the counter to raise the air bubbles out of the batter.
7. Bake at 180C (350F) for 12 minutes till lightly brown. (cooking time may differ depend on the heat of the oven)
8. When it's done, drop the pan lightly to prevent shrinking. Remove the sponge cake from the pan by lifting the parchment paper and place it on a wire rack to cool. 
9. When it's cool enough, remove the parchment paper and place the sponge cake on the parchment paper with the brown side up.

Filling

1. Whisk double cream and sugar on high speed in a bowl until it forms a soft peak. Sift in the matcha green tea powder and whisk until stiff.
2. Coat the surface of the sponge cake evenly with the cream. Line the strawberries in the middle over the creamed surface.
3. Roll and wrap the cake in the parchment paper and put in a fridge for 30 minutes to set.
4. Decorate and enjoy!


Figs and Berries Fruit Tart


It takes a few hours for the washing machine to finish washing and drying the clothes, I like to make something fast and simple during laundry. Here is an easy peasy recipe.

Cherie Kelly's Figs and Berries Fruit Tart

Figs and Berries Fruit Tart


Ingredients

50g melted dark chocolate (or milk chocolate)
100g custard
400g berries and figs
3 tablespoons Apricot jam 

Method

1. Heat the oven to 180C. Line a 8-inch tart tin with the pastry. Bake blind for 10 minutes, and then remove the paper and weights. Bake for 15 more minutes.
2. Leave the tart to cool in the tin. 
3. Spread melted dark chocolate onto the tart. Chill for 5 mins.
4. Spoon the custard onto the tart and place the fruit on the top.
5. Melt the apricot jam (I microwave for 30 seconds to 1 min), brush the jam on top of the fruits.
6. Chill the tart in the tin in the fridge for at least 1 hour, remove from the tin before serving. 


Chocolate Mousse Cake

My sister was asking me if I could make her some rich dark chocolate cake, she loves dark chocolate like me, we made this chocolate mousse cake together during her visit, this cake got 4 layers of different textures - chocolate glaze, chocolate mousse, chocolate cake and crunchy chocolate nuts bottom. we like it very much because it tasted very rich and dark.

You can substitute dark chocolate with milk chocolate with this recipe, double the amount to make a  whole 8 inch cake.

Cherie Kelly's Chocolate Mousse Cake


Chocolate Mousse Cake

Ingredients

Chocolate Mousse

200g dark chocolate (can substitute with milk chocolate)
200g whipping cream
200g whipped cream
4g leaf gelatin

Chocolate Glaze

90g whipping cream
70g water
90g sugar
45g cocoa powder
10g leaf gelatin

Chocolate Sponge Cake

2 egg
40g caster sugar
1.5 tablespoon milk
30g plain flour
7g cocoa powder
butter to grease
100g dark chocolate (optional)
50g chopped nuts of your choice (optional)

Utensils

6 half sphere moulds
8-inch rectangle brownie pan (large enough to cut out 6 smaller circles cake with the same diameter of the individual half-sphere mould will do)

Methods

For the Chocolate Sponge Cake

1. Line the brownie pan with greased parchment paper. Preheat the oven to 180C (350F).
2. Beat eggs and sugar with wire whisk in a metal bowl over a pan of hot water.
3. Beat the batter on high speed for about 7 minutes until white and fluffy with an electric mixer.
4. Add milk and fold together until combined.
5. Sift in flour and cocoa powder, whisk for about 3 minutes on low speed to incorporate.
6. Spread the batter in the brownie pan and drop the pan lightly on the counter to raise the air bubbles out of the batter.
7. Bake at 180C (350F) for 12 minutes till lightly brown. (cooking time may differ depend on the heat of the oven)
8. When it's done, drop the pan lightly to prevent shrinking. Remove the sponge cake from the pan by lifting the parchment paper and place it on a wire rack to cool.
9. When it's cool enough, remove the parchment paper and place the sponge cake on the parchment paper with the brown side up. Cut out 6 circles of cake slices with the same diameter of the individual half-sphere mould.
10. (Optional) Spread the slices with melted chocolate and chopped nuts, put into the fridge to set.

For the Chocolate Mousse

1. Soak the gelatin leaves in ice/cold water for later use.
2. Bring the whipping cream to boil. Pour into the melted chocolate, stir until well incorporated.
3. Take and squeeze out all water from the gelatin leaves, stir the gelatin leaves into the chocolate mixture until dissolved.
4. Fold in whipped cream until smooth.
5. Fill the moulds to 4/5 full of chocolate mousse. Place the cake slides onto the mousse, gentle press to let the mousse stick around the sides of the cakes. Fridge 7 hours or overnight to set.

For the Chocolate Glaze

1. Soak the gelatin leaves in ice/cold water for later use.
2. Mix whipping cream, water and sugar, bring them to boil.
3. Add cocoa powder and cook to 102 degree, stir constantly to avoid mixture sticking to saucepan. Remove the saucepan from heat.
4. Take and squeeze out all water from the gelatin leaves, stir the gelatin leaves into the chocolate mixture until dissolved.
5. Let cool to 35 degree.

Assemble

1. Gently un-mould the cakes.
2. Place the cakes on a wire rack and pour the glaze over. (I used an easier-to-clean-up method: carefully lift and put a cake on a spatula/turner, hold it over the glaze with one hand, use a spoon to pour the glaze over with another hand, gently shake away the excess glaze with the spatula/turner)
Cherie Kelly's Chocolate Glaze

3. Put into the fridge for 3 hours to set, decorate and serve.


2012-07-27

Osmanthus Jelly Coconut Pudding 桂花椰汁糕

It suddenly came to me I could make some Osmanthus Jelly Coconut Pudding 桂花椰汁糕 for this summery week, serving them cold is just prefect!

Cherie Kelly's Osmanthus Jelly Coconut Pudding 桂花椰汁糕

Osmanthus Jelly Coconut Pudding 桂花椰汁糕 

Ingredients


For the Coconut Pudding
200ml coconut milk
70ml double cream
90g caster sugar
400ml hot water
20g gelatin powder

For the Osmanthus Jelly 
20g gelatin powder
90g caster sugar
4 tbs dried osmanthus
250ml hot water
200ml cold water

Method


Coconut Pudding
1. Mix sugar and gelatin powder with hot water until dissolved.
2. Stir in coconut milk and cream.
3. Pour and fill half of the mould, chill for 20 mins until the surface is set.

Osmanthus Jelly 
1. Mix sugar and gelatin powder with hot water until dissolved.
2. Stir in the dried osmanthus and cover the bowl with a plate for 5-10 mins for the flavour to diffuse, add cold water.
3. Pour and fill the remaining half of the mould, chill overnight for the whole jelly and pudding to be set.


Green Tea (Matcha) Chocolate Brownies

My sister has brought me quite a lot of green tea chocolate when she visited, we wanted to make good use to it by using them to make rich green tea flavour cakes, something gooey like fondant would be best, so I decided to make these rich green tea chocolate brownies. We all love it so much :-d

Cherie Kelly's Green Tea (Matcha) Chocolate Brownies

This is the matcha chocolate we used, it is very rich on its own, even greater to be an ingredient to make cakes.


Green Tea (Matcha) Chocolate Brownie


Ingredients


120g matcha chocolate
80g butter
2 eggs
120g caster sugar
90g plain flour
10g matcha powder


Method


1. Break the chocolate into small pieces and melt it with the butter over hot water (or melt them by microwaving for 1 min depemds on your microwave setting), mix until smooth and leave it cool down.

2. In a separate bowl, whisk the eggs and sugar until light and pale, mix together with the chocolate and sifted matcha powder and flour.

3. Line a 8 inch square baking tin with greaseproof paper. Pour the brownie mixture into the baking tin and bake in the a preheated oven for around 30 minutes at 180 degree.

4. The brownies should be slightly crisp on the outside but still moist in the middle. Allow to cool in the tray, cut into squares to serve.


2012-07-26

Creme Brûlée

Another simple recipe to use up the egg yolks when the egg whites are saved up for making macarons :-P

Cherie Kelly's Creme Brûlée


Recipe adapted from allrecipes

Creme Brûlée 

Make 5-6 servings

Ingredients


6 egg yolks
75 g white sugar, divided
3 ml vanilla extract
590 ml heavy cream
25 g brown sugar


Method

1. Preheat oven to 300 degrees F (150 degrees C).
2. Beat egg yolks, 4 tablespoons sugar and vanilla in a mixing bowl until thick and creamy.
3. Pour cream into a saucepan and stir over low heat until it almost comes to boil. Remove the cream from heat immediately. Stir cream into the egg yolk mixture; beat until combined.
4. Pour cream mixture into the top of a double boiler. Stir over simmering water until mixture lightly coats the back of a spoon; approximately 3 minutes. Remove mixture from heat immediately and pour into a shallow heat-proof dish.
5. Bake in preheated oven for 30 minutes. Remove from oven and cool to room temperature. Refrigerate for 1 hour, or overnight.
6. Preheat oven to broil.
7. In a small bowl combine remaining 2 tablespoons white sugar and brown sugar. Sift this mixture evenly over custard. Place dish under broiler until sugar melts, about 2 minutes. Watch carefully so as not to burn.
8. Remove from heat and allow to cool. Refrigerate until custard is set again.


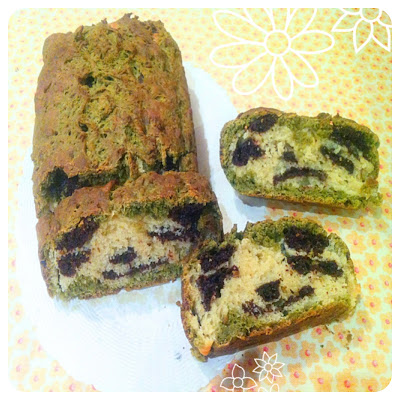
Panda Bread

My colleagues from work make very nice professional Italian bread, they bring me some to try every now and then, I am so impressed because they taste so much softer and fresher than those you buy from bakery shops. I thought it shouldnt be too difficult to make like those baking programs on tv, I was so curious to try to make my own, then I realized making bread do require some skills! it was very fun though with all sticky hands :-P especially I picked this cute panda bread recipe from Not Quite Nigella which I have been eyeing on for a while.
Cherie Kelly's Panda Bread

Cherie Kelly's Panda Bread

Recipe adapted from Not Quite Nigella 


Panda Bread

Ingredients: 

Makes approximately 600g/21ozs loaf (206mm x 108mm x100mm high)

270g/9.5ozs all purpose flour
30g/1oz cornflour
30g/1oz sugar
Milk + 1 egg yolk = 21 0g/7.4ozs
4.5g/0.18ozs salt
20g/0.7 ozs unsalted butter (I used 20g)
4g/0.14ozs yeast
8g/0.28ozs green tea powder dissolved in 2 tablespoons boiling hot water
8g/0.28ozs cocoa powder dissolved in 2 tablespoons boiling water

Method:

1. Heat up milk and yolk to temperature of 38℃/100F. (I beat the yolk lightly with milk and send it to the microwave on High for 30 seconds).

2. Place flours, salt, yeast, sugar in an electric mixer fitted with a Dough Hook and set on low setting to combine. Then add milk and egg mixture and softened butter and knead on low setting for 5-6 minutes until elastic.

3. Divide dough (about 560g or just over 1 pound) into 3 parts: 75g/2.64ozs for the chocolate, 210g/7.4ozs plain and the rest of the dough which is less than 280g/9.8ozs for the green tea.

4. Add chocolate to the 75g/2.64ozs dough and knead till the colour is even. Add green tea mixture to the 280g/9.8ozs dough and knead till colour is even. If you do these manually, make sure that your hands and bench space where you need are cleaned between kneading to avoid transferring the colours.

5. Prove all 3 pieces of doughs on separate greased plates covered loosely with oiled cling wrap for 30 – 40 minutes.

6. Punch air out of dough and prove for another 20 – 30 minutes.

7. Use 90g/3ozs plain dough for the face and 2 pieces of 27g/1oz chocolate dough for the eyes.

8. Fill the hollow of the eyes with 30g/1oz plain dough.

9. Roll remaining plain dough over the patterned dough.

10. Divide the remaining chocolate dough into 2 pieces (17.5g each/0.61ozs) for the ears.

11. Use 70g/2.47ozs of the green tea dough to fill up the hollow between the ears.

12. Wrap the rest of the green tea dough all around the patterned dough.

13. Place dough into a well-greased loaf pan and cover it with a lid and prove for 50 – 60 minutes in an enclosed are. As it’s cold here and we’re in the middle of Winter, I set the pan in a larger container filled with warm water and refreshed the water with hot water 3-4 times to make sure that it rose.


2012-07-23

Carrot Cupcakes

My sister and I like carrot cakes, she said carrot cupcake would be the first thing she would like to have during her visit in London, no doubt I would make her some as they are so easy to make anyway :-P

Cherie Kelly's Carrot Cupcakes

Recipe adapted from BBCGoodFood

Carrot Cupcakes


Ingredients


300g plain flour
2 tsp cinnamon
1 tsp baking powder
½ tsp bicarbonate of soda
200g soft brown sugar
4 eggs
250ml oil
1 orange , zested
1 lemon , zested
200g carrots , finely grated
150g walnuts , chopped
227g tin pineapple pieces, well drained and chopped (optional)

Equipment

15-16 muffins trays lined with cupcake cases / 6-7 inches cake baking tin

For the cream chesse frosting

125g unsalted butter at room temperature
50g icing sugar
250g cream cheese

Method

1. Heat the oven to 150C/fan 130C/gas 2. Line a 20cm, 10cm deep cake tin. Sift the flour, cinnamon, baking powder and bicarbonate of soda together and stir in the sugar. Beat the eggs with the oil and citrus zests. Stir in the carrots and fold everything into the flour mixture. Fold in the walnuts and pineapple if using. Spoon the mixture into the tin and bake for 1 hour 20 minutes or until a skewer comes out clean. Cool.

2. For the frosting, beat the butter and icing sugar together until soft and then beat in the cream cheese. Chill the mixture until it's thick but spreadable. Spread a thick layer on top of the cake, making sure the side of the icing is flat and continues upwards from the side of the cake.


French Fraisier

I like picking the freshest fruits from markets to make my cakes/patisseries, strawberries have been in season in Britain, I have this recipe in mind I always wanted to try to make good use of the strawberries.

Cherie Kelly's French Fraisier

Recipe modified and adapted from Tony Wong

French Fraisier


Génoise (Sponge Cake)


Ingredients

4 eggs
120g caster sugar
3 tsp water 
120g cake flour
40g melted butter

Equipment

7-inch cake mould (circle or square)
electric mixer

Method

1. Place eggs and sugar into a metal bowl over a pan of hot water. 
2. Beat the batter on high speed for about 7 minutes until fluffy and thickened with an electric mixer. 
3. Sift and fold in flour.
4. Add and stir in the melted butter.
5. Pour the batter into the cake mould. Lift and drop the baking tin onto the table carefully to get rid of the excess air bubbles.
6. Bake at 180 degree for 20-25 minutes. Insert a skewer into the middle of the cake, the cake is done if the skewer comes out clean. Cool on the rack.
7. Cut the cake horizontally into 2 even slices for later use.

Vanilla Mousseline

Ingredients

500g milk
1 tbsp vanilla bean paste
150g granulated sugar
62.5g corn flour
120 egg yolk
250g butter
30-50 fresh strawberries
60g whipped cream for decoration (whip 60g whipping/double cream with 1-2 tbsp caster sugar)

Method

1. Bring milk and vanilla bean paste to boil, turn off heat, cover and infuse for 1 hour.
2. Mix corn flour with half portion (62.5g) sugar. Pour in 1/5 milk (about 100g) and stir. 
3. Stir or whisk until smooth.
4. Add in egg yolk and stir well.
5. Bring the remaining milk and half portion of sugar to boil.
6. Pour boiling milk mixture (from step 5) into egg yolk mixture (from step 4). Stir well and pour mixture back to saucepan. Bring to boil.
7. Keep stirring to light yellow thick paste.
8. Strain into a bowl over a pan of ice water, let cool to 60 degree.
9. Add and whisk in the unsalted butter until fully incorporated. Cover with cling film and refrigerate for 3 hours.

Assemble

1. Place 1 slice of sponge cake at the bottom of the baking tin as the cake base. Spread a thin layer of Vanilla Mousseline on the cake slice. Line halfed strawberries evenly along the sides of the tin.
2. Place whole strawberries with same height into the tin. (Use clean cloth/kitchen paper to dry strawberries. Do not rinse. Wet strawberries do not stick with the Vanilla Mousseline, they fall out when the cake is sliced)
3. Pipe Vanilla Mousseline in between strawberries and on the surface until all strawberries are covered.
4. Top with another slice of sponge cake.
5. Spread the whipped cream on top of the cake and decorate.


2012-07-09

Pierre Hermé Rose Macarons

I have been trying different macarons from different pâtisserie shops, I think you will also agree with me once you try Pierre Hermé's, his renowned macarons are simply top-notch! and definitley his pâtisseries too! I would love to make macarons that taste as nice as his :-d

Cherie Kelly's Rose Macarons
Cherie Kelly Rose Macarons


Recipe adapted from Macarons by Pierre Hermé

Pierre Hermé Rose Macarons

Ingredients

For the macaron shells:
300g Ground Almonds
300g Icing Sugar
110g Egg Whites (aged in the fridge for a few days to a week)
5g Red Food Colouring
300g Granulated Sugar
75g Water
110 Egg Whites (aged in the fridge for a few days to a week)

For the Rose Buttercream
200g Granulated Sugar
75g Water
150g Eggs
90g Egg Yolks
400g Butter, very soft
4g Rose Essence 
50g Rose Syrup

Methods

Macaron Shells

1. Sieve the ground almonds and icing sugar into a bowl. Add the colouring into the first portion of egg whites, pour them into the sugar/almond mixture but do not stir.

2. Bring the water and sugar to boil to 118 degree in a saucepan. When the sugar syrup reaches 115 degree, start whisking the second portion of egg whites until soft peaks. Once the syrup reaches 118 degree, pour it over the egg whites take down the side of the bowl, continue to whisk on high speed until it cools down to 50 degree and turns glossy.

3. Pour all of the meringue to the bowl with the almond sugar mixture. Fold fold the mixture with a large spatula until it starts to shine and forms a visible ribbon.

4. Spoon the mixture into a piping bag fitted with a plain nozzle and pipe rounds of 3.5cm with 2cm gaps apart from each other onto parchment paper. Set aside for about 30 minutes or until a skin forms that does not stick onto your finger.

5. Bake the macarons in preheated oven between 160-180 degree for 12 mintues. Remove the macaron shells from the oven and tray, place the parchment onto the work surface and let cool completely before removing the shells.

Rose Buttercream

1. Boil the sugar and water in a saucepan until 120 degree. At the same time, whisk the eggs and egg yolks in a bowl until thickened and lightened in colour.

2. Pour the syrup down the side of the bowl and continue to whisk until cooled.

3. Cream butter in another bowl until thickened, add the egg mixture and whisk until smooth, then beat in the rose syrup and essence.

4. Sandwich macaron shells with the buttercream, chill for 24-48 hours to set before serving.


2012-07-08

Strawberry Soufflé Roll Cake

Strawberries, raspberries, blueberries and blackberries are all in season, with the Jubilee atmosphere everywhere, I made this simple roll cake to join in the theme ;-)

Cherie Kelly's Strawberry Soufflé Roll Cake

Strawberry Soufflé Roll Cake

Ingredients:

For the Sponge Cake
3 egg
65g caster sugar
2 tablespoon milk 
45g plain flour
butter to grease
10g of dried crushed strawberries (optional, or you can substitute with cocoa or matcha powder)
a few drop of pink food colouring (optional)

For the Filling
200ml double cream
3 tablespoon caster sugar
200g strawberries (or fruits of your choice)

Equipment
9-inch square brownie pan
electric mixer

Method:

Sponge Cake
1. Line the brownie pan with greased parchment paper. Preheat the oven to 180C (350F).
2. Beat eggs and sugar with wire whisk in a metal bowl over a pan of hot water. 
3. Beat the batter on high speed for about 7 minutes until white and fluffy with an electric mixer. 
4. Add milk and fold together until combined.
5. Sift in flour, dried strawberries, pink colouring and whisk for about 3 minutes on low speed to incorporate.
6. Spread the batter in the brownie pan and drop the pan lightly on the counter to raise the air bubbles out of the batter.
7. Bake at 180C (350F) for 12 minutes till lightly brown. (cooking time may differ depend on the heat of the oven)
8. When it's done, drop the pan lightly to prevent shrinking. Remove the sponge cake from the pan by lifting the parchment paper and place it on a wire rack to cool. 
9. When it's cool enough, remove the parchment paper and place the sponge cake on the parchment paper with the brown side up.

Filling
1. Whisk double cream and sugar on high speed in a bowl until it forms a soft peak.
2. Dice the fruits of your choice.
3. Coat the surface of the sponge cake evenly with the cream. Line the fruits in the middle over the creamed surface.
4. Roll and wrap the cake in the parchment paper and put in a fridge for 30 minutes to set.
5. Decorate and enjoy!


2012-07-05

Chestnut Mont Blanc

When I first tried this traditional french Chestnut Mont Blanc, it was from Laduree, disappointingly it was way too sweet for me and the chestnut cream was dry. I decided to make it myself for a less sweet version with chocolate cake as the base to give some depth.

Cherie Kelly's Chestnut Mont Blanc

Chestnut Mont Blanc

Ingredients:


For the 6 individuals Chocolate soufflé cakes
2 eggs
45g caster sugar
1.5 tablespoons of Milk
30g flour
7g cocoa powder
A knob of butter to grease

For the Crème Chantilly
300g Whipping cream
30g Sugar

For the Crème Marron Chantilly
400g/A can of chestnut puree
150g Crème Chantilly
( from above)

For the Filling/Decoration
280g/A can of whole chestnuts ( around 6 crusted for the filling, 6 whole for decoration)
100g dark chocolate to drizzle
1 tablespoon of cocoa powder

For the Tool
6-cup Muffin Pan

Method:

Make the Chocolate soufflé cake
1.    Grease the muffin pan
2.    Beat eggs and sugar with wire whisk in a metal bowl over the pan of hot water on high speed for about 7 minutes until white and fluffy with an electric whisk.
3.    Add milk and mix, sift in flour and cocoa powder, fold till they are all well incorporated. Beat on low speed for 2 minutes to set the texture.
4.    Spoon the batter in the muffin pan and bake at 180C (350F) for 11-12 minutes till cooked
5.    Remove the individual cakes from the pan and place it on a wire rack to cool. 

Make the Crème Chantilly:
1.    Whip the whipping cream with sugar until stiff peaks form. Half the cream and save for Crème Marron Chantilly.
2.    Put the cream into piping bag and pipe the Crème Chantilly over the top of the individual cakes, place some crusted chestnut on top and drizzle a teaspoon of dark chocolate.
3.    Refrigerate for 1 hour.

Make the Crème Marron Chantilly:
1.  Whip the chestnut puree until fluffy.
2.    Fold in the Crème Chantilly and whip until combine.
3.    Put the cream into piping bag fit with 3mm nozzle, and pipe the cream over the Crème Chantilly.
4.  To decorate, sift some cocoa powder, pipe little Crème Chantilly and place a whole chestnut on top. Refrigerate for 2 hours or overnight and enjoy!


2012-07-03

Flan De Leche (Creme Caramel)

I dont like wasting food, I always want to use up the egg yorks after separating the egg whites to make macarons, I find a simple recipe to make this creamy dessert.

Cherie Kelly's Creme Caramel

Recipe adapted from Cafe Munchkin

Flan De Leche (Creme Caramel)                                                                                                           

Ingredients:                                                                       

8 large egg yolks
1 can evaporated milk
1 can condensed milk
1 cup sugar and just enough water to give the sugar the consistency of wet sand for the caramel
a 8-inch round cake pan (I used 8 heart-shaped mould)

Method:

1.  Caramelize the sugar on a heavy-bottomed stainless steel pan.  Once you’ve got the sugar caramelized to a nice golden amber, coat the bottom and a portion of the sides as well of an 8-inch round pan with the caramel. Set aside.
2.  In a bowl, gently whisk the eggs.  Then add the condensed milk and evaporated milk.
3.  Whisk some more until the ingredients are well blended.  Do not overmix to avoid bubbles.
4.  Strain the mixture then transfer to the pan with caramelized sugar.
5.  Cover the pan/mould with aluminum foil and place  in a steamer.
6.  Steam for 45-60 minutes, testing for doneness with a toothpick.  Alternatively, you can cook your leche flan in the oven.  Place the pan on a water bath and bake at 350F.  Test for doneness at 45 minutes.  This may take a wee bit longer.
7.  When it’s done, let cool then chill in the refrigerator.


2012-07-02

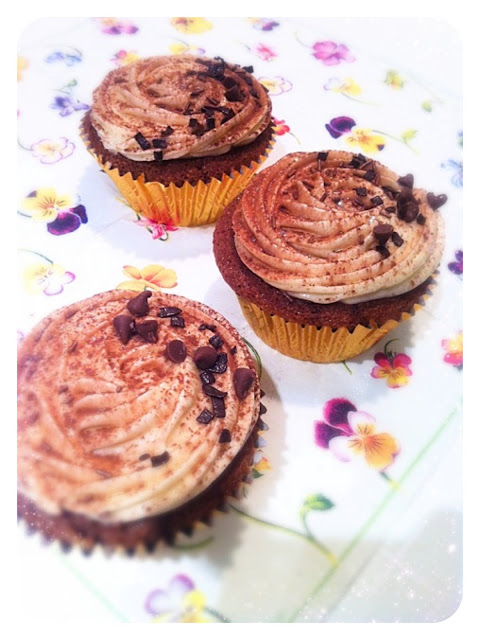
Tiramisu Cupcakes

I was wondering if I could incorporate a dessert into a cupcake to make it more interesting, tiramisu would be a great one, and I found a recipe that does actually what I want - with mascarpone cheese filling!

Cherie Kelly's Tiramisu Cupcakes
Recipe adapted from beckysbaking


Tiramisu Cupcakes

(Makes 24 cupcakes)

Cupcake

* 1 (18 1/4 ounce) package white cake mix prepared as directed on box. I used Duncan Hines extra moist french vanilla cake mix.

Liquid Coffee Layer

* 2/3 cup water, boiling
* 1/2 cup confectioners' sugar
* 1 1/2 tablespoons instant coffee

Mascarpone Filling

* 1 cup mascarpone cheese (from tub)
* 3 tablespoons Kahlua (or coffee extract)
* 1/4 cup sweetened condensed milk
* 1 (8 ounce) container french vanilla cool whip or regular cool whip with some vanilla extract added in.

Frosting (double this if you are going to be piping the frosting on top)

* 1 (8 ounce) package cream cheese, softened
* 1/2 cup butter, softened
* 2 cups confectioners' sugar
* 1 teaspoon vanilla extract
* chocolate shavings or cocoa powder (to garnish)

Directions

1. Make Mascarpone filling mix first & allow to chill 4-6 hours or overnight.

2. Mascarpone filling: Beat mascarpone, Kahlua and condensed milk until well blended. Fold in cool whip. Chill 4-6 hours.

3. Prepare cupcakes as directed on box of white cake mix & bake accordingly. While these are baking prepare the liquid coffee as below.

4. Liquid Coffee: Boil 2/3 cup water in microwave (or boil on stove) and stir in instant coffee then powdered sugar & allow to cool to tepid.. Once cooled, use a fork to poke holes into cupcakes so that they will absorb the liquid coffee & then brush liquid coffee onto each cupcake using silicone baking brush.

5. Fill pastry/icing bag with Mascarpone filling & inject about 1 spoonful via bag directly into top-center of each cupcake.

6. Prepare Cream Cheese/Buttercream Frosting: Beat butter and cream cheese until creamy with hand mixer on low. Slowly add powdered sugar, scraping down the sides of the bowl as necessary. Add vanilla and increase mixer to medium. Blend until frosting is fluffy.

7. Frost each cupcake with frosting & garnish with chocolate shavings (use dark chocolate bar & cheese grater).


2012-07-01

Chocolate and Matcha (Green Tea) Fondants

Sometimes I like to bake something simple to have an early Sunday night. I stocked up some matcha chocolate when I went back to Hong Kong in xmas, they were very difficult to find, I have been saving them to make fondants.
Cherie Kelly's Chocolate and Matcha Fondants
This is the matcha chocolate I used, I want to find more of it :-0 because matcha fondants taste so rich and nice, I prefer matcha flavour over chocolate flavour foundants.


Recipe adapted from bbcgoodfood
(I halfed the amount to make both chocolate and matcha fondants)

Chocolate Fondants

Ingredients:

50g melted butter , for brushing
cocoa powder , for dusting
200g good-quality dark chocolate, chopped (substitute with matcha chocolate for matcha fondants)200g butter , in small pieces
200g golden caster sugar
4 eggs and 4 yolks
200g plain flour
Vanilla ice cream, to serve

Method:

1. First get your moulds ready. Using upward strokes, heavily brush the melted butter all over the inside of the pudding mould. Place the mould in the fridge or freezer. Brush more melted butter over the chilled butter, then add a good spoonful of cocoa powder into the mould. Tip the mould so the powder completely coats the butter. Tap any excess cocoa back into the jar, then repeat with 1 the next mould.
2. Place a bowl over a pan of barely simmering water, then slowly melt the chocolate and butter together. Remove bowl from the heat and stir until smooth. Leave to cool for about 10 mins.
3. In a separate bowl whisk the eggs and yolks together with the sugar until thick and pale and the whisk leaves a trail; use an electric whisk if you want. Sift the flour into the eggs, then beat together.
4. Pour the melted chocolate into the egg mixture in thirds, beating well between each addition, until all the chocolate is added and the mixture is completely combined to a loose cake batter.
5. Tip the fondant batter into a jug, then evenly divide between the moulds. The fondants can now be frozen for up to a month and cooked from frozen. Chill for at least 20 mins or up to the night before. To bake from frozen, simply carry on as stated, adding 5 mins more to the cooking time.
6. Heat oven to 200C/fan 180C/gas 6. Place the fondants on a baking tray, then cook for 10-12 mins until the tops have formed a crust and they are starting to come away from the sides of their moulds. Remove from the oven, then leave to sit for 1 min before turning out.
7. Loosen the fondants by moving the tops very gently so they come away from the sides, easing them out of the moulds. Tip each fondant slightly onto your hand so you know it has come away, then tip back into the mould ready to plate up.
8. Starting from the middle of each plate, squeeze a spiral of caramel sauce - do all the plates you need before you go on to the next stage.
9. Sit a fondant in the middle of each plate. Using a large spoon dipped in hot water, scoop a 'quenelle' of ice cream.
10. Carefully place the ice cream on top of the fondant, then serve immediately. Repeat with the rest of the fondants.


Madeleines

Cherie Kelly's Madeleines
I couldn't resist buying this baking mould when I saw it in Morocco, it has these cute shell, heart and bear shapes ♪ I used it immediately to make these Madeleines once I came back from holiday.

Recipe adapted from allrecipes.com


Madeleines 

Ingredients:

2 eggs
3/4 teaspoon vanilla extract (I used vanilla paste for more intense flavour)
1/8 teaspoon salt
65 g white sugar
60 g all-purpose flour
1 tablespoon lemon zest (I skipped the zest)
55 g butter
65 g granulated sugar for decoration

Directions:

1. Preheat oven to 375 degrees F (190 degrees C). Butter and flour 12 (3 inch) madeleine molds; set aside.
2. Melt butter and let cool to room temperature.
3. In a small mixing bowl, beat eggs, vanilla and salt at high speed until light.
4. Beating constantly, gradually add sugar; and continue beating at high speed until mixture is thick and pale and ribbons form in bowl when beaters are lifted, 5 to 10 minutes.
6. Sift flour into egg mixture 1/3 at a time, gently folding after each addition.
7. Add lemon zest and pour melted butter around edge of batter. Quickly but gently fold butter into batter.
8. Spoon batter into molds; it will mound slightly above tops.
9. Bake 14 to 17 minutes, or until cakes are golden and the tops spring back when gently pressed with your fingertip.
10. Use the tip of the knife to loosen madeleines from pan; invert onto rack. Immediately sprinkle warm cookies with granulated sugar. Madeleines are best eaten the day they're baked. Leftover madeleines are wonderful when dunked into coffee or tea.
Variation: Chocolate Madeleines: Omit lemon zest. Increase sugar to 1/2 cup. Substitute 1/4 cup unsweetened cocoa powder for 2 tablespoons of the flour; sift into batter with flour.