2013-08-21

Passionfruit & Mango, Blueberry & Blackberry, Raspberry & Strawberry Cheesecakes; Figs, Mango and Raspberry Tarts ❤

I realised I have set up this sweet space for a year already! Happy 1st Anniversary to Cherie Kelly :) and massive thank you to everyone who likes my page, who visits my site, who emails/messages me, who comments on my posts, who supports me and places orders with me! every little things mean a lotttt to me xoxoxoxoxooxox

I also think it is also time to invest in a SLR camera for better pictures in this blog/website, cant be too lazy taking pictures with iphone all the time :-P  made these colourful Passionfruit & Mango, Blueberry & Blackberry, Raspberry & Strawberry Cheesecakes; Figs, Mango and Raspberry Tarts to test my camera, not too bad eh? : )


Passionfruit and mango is definitely a very good combination for cheesecake :-O
Cherie Kelly's Passionfruit & Mango, Blueberry & Blackberry, Raspberry & Strawberry Cheesecakes; Figs, Mango and Raspberry Tarts ❤

My new toy :-D yes yes a red camera not the boring black ones, this is the main reason i picked this :-P

Mango and Passionfruit Cheesecake

Ingredients

For the Biscuit Base

180g digestive biscuits, crusted
50g butter, melted

For the Cheesecake

300g low fat cream cheese
70 g caster sugar
1 tbsp vanilla extract
1 tbsp lemon juice
10g gelatin leaves, soaked and softened in cold water, dissolved in 20ml boiling water
200ml whipping cream

For the Mango and Passionfruit Coulis Jelly

250g fresh mango and passionfruit, blended into puree
100g sugar
80ml water
2 tbsp lemon juice
6g gelatin leaves,
Some mango and passionfruit to decorate, optional

Utensils

6 presentation rings lined with Acetate Cake Collars or 7 inches springform tin

Method

For the Biscuit Base

1. Put the digestive biscuits and melted butter into a blender and pulse until they resemble breadcrumbs.
2. Spoon the biscuit mixture into the presentation rings placed on a large plate or springform tin. Press the mixture down firmly and chill in the fridge until set.

For the Cheesecake

1. Place the cream cheese, sugar, vanilla extract and lemon juice in a bowl and beat until creamy.
2. Add the melted gelatin liquid into the cream cheese mixture until well combined.
3. In another bowl, whip the whipping cream until stiff. Fold the whipped cream into the cream cheese mixture.
4. Spoon the mixture on top of the biscuit mixture and smooth the tops with the back of a spoon. Chill in the fridge until set for at least an hour.

For the Mango and Passionfruit Coulis Jelly

1. Put the mango and passionfruit puree and sugar into a small saucepan, boil on medium heat, gradually stir in the water and lemon juice.
2. Remove the saucepan from heat when the fruit mixture starts to boil, squeeze out the excess water from the gelatin leaves, stir well into the mixture until the leaves dissolved.
3. Set aside until it is cool.
4. Spoon the mixture on top of the cheese mixture. Chill in the fridge until set for at least an hour or overnight.
5. To serve, carefully remove the presentation rings and cake collars or the tin from the cheesecakes. Decorate with some mixed berries and enjoy!


Cherie Kelly's Passionfruit & Mango, Blueberry & Blackberry, Raspberry & Strawberry Cheesecakes; Figs, Mango and Raspberry Tarts ❤

Mango Tart

Ingredients

For the Tart

260g plain flour
2 tbsp icing sugar
150g unsalted butter at room temperature, cut in cubes
1 egg, whisked

For the Creme Patisserie

3 large egg yolks
50g golden caster sugar
17g corn flour
167ml full cream milk
1 tbsp vanilla bean paste

For the Mango Topping

100g milk or dark chocolate, melted
650g of Mango, sliced
6g gelatin leaves, soaked and softened in cold water
2 tbsp sugar
40ml boiling water

Utensils

10 x 3.5 inches loose base round tart cases

Method

For the Tart

1. Put flour, icing sugar and butter in a large clean bowl. Rub the butter into the flour mixture with your fingertips until the mixture resembles fine breadcrumbs.
2. Add 1 egg and 1 tbsp cold water gradually to the mixture until the dough comes together.
3. Wrap the dough in clingfilm and chill for 30 mins.
4. Lightly dust a work surface with flour. Gently roll out pastry to 3-4 mm thick.
5. Line the pastry into the tart case. Gently press the side and trim away the excess pastry.
6. Prick the base with a fork. Chill the pastry in the tin for 30-60 mins.
7. To blind bake the tart case: Preheat oven to 180C. Line pastry case with baking paper and fill with baking beans (can substitute with any other dry beans). Bake for 10 mins until pastry sides are set.
8. Remove beans and baking paper and return tin to oven for 10 mins until base is cooked through.
9. Take the tin out from the oven and set aside.

For the Creme Patisserie

1. Beat the egg yolks, sugar, and flour in a bowl to make a smooth paste.
2. Bring the milk and vanilla bean paste to the boil in a saucepan.
3. As soon as it reaches the boil, pour it over the egg mixture, stir well.
4. Return the whole mixture to the saucepan and cook over a low heat, stir constantly until the sauce is very thick and bubbling.
5. Transfer to a bowl and cover the surface with cling film to prevent a skin forming and leave to cool completely. Refrigerate until ready to use.

For the Mango Topping

1. Spread a thin layer of melted chocolate onto the centre of the tarts, chill the tarts in the fridge for several minutes until the chocolate is set.
2. In the meantime, melt the gelatin leaves and sugar with the boiling water, keep stirring until dissolved, set aside to cool.
3. Pipe the creme patisserie on top of the chocolate and tart.
4. Arrange mango slices like rose petals on top of the tarts.
5. Brush a thin layer of melted gelatin liquid onto the fruits, chill in the fridge until set for at least an hour before serving.


2013-08-12

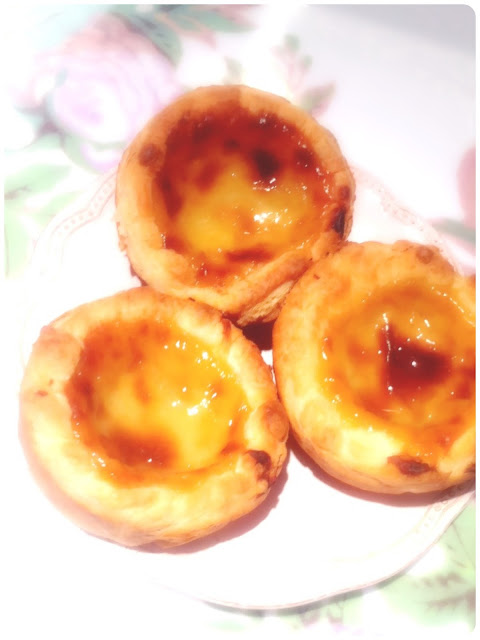
Portuguese Egg Custard Tarts (Pasteis de Nada) 葡撻

2 years ago, I had a crazy craving for some Portugese Egg Custard Tarts, those I found in London were not quite up to standard, I know Pasteis De Belem does the best Pasteis de Nada in Portugal, so we went to Lisbon over a bank holiday to satisfy my crave :-P

The crave is back.. :-0 this time i decided to make them myself ;-D

Cherie Kelly's Portugese Egg Custard Tarts (Pasteis de Nada) 葡撻

The creamy soft egg custard and the crispy buttery puff pastry are just heaven, they are all gone so quickly once they are out from the oven!


Portugese Egg Custard Tarts (Pasteis de Nada) 

Makes about 12 pastries

Ingredients


For the pastry

2 packages 320g all-butter ready-rolled puff pastry 

For the egg custard

2.5 tablespoons cornflour
40ml milk
225g granulated sugar
110ml water
200ml double cream
1 tbsp vanilla bean paste
5 large egg yolks, whisked

Utensils 

12 holes muffin tin with 2.0-2.5 inches diameter base

Methods

To make the custard

1. Mix the cornflour and milk in a medium bowl until combined. Set aside.
2. Put the sugar and water in a small saucepan, bring them to boil and remove from heat until it reaches 100°C. Do not stir.
3. Meanwhile, heat the double cream in another small saucepan until it starts to bubble, gradually pour the hot cream into the flour mixture, keep whisking until the mixture is well combined and thickened.
4. Carefully pour the sugar syrup from a side the hot cream and flour mixture, add the vanilla bean paste and stir until smooth and incorporated. Whisk in the yolks, strain the mixture into a bowl, cover with plastic wrap, and set aside.
Cherie Kelly's Portugese Egg Custard Tarts (Pasteis de Nada) 葡撻

To assemble and bake the pastries

5. Pre-heat the oven to 250°C. Lightly grease 12 muffin cups and line bottom and sides with puff pastry.
6. Fill pastry-lined muffin cups 3/4 full with the custard and bake in preheated oven for 20 minutes, or until crust is golden brown and filling is lightly browned on top.
7. Remove from the oven and allow the pasteis to cool a few minutes in the pan, then transfer to a rack and cool until just warm.
8. Serve warm with cinnamon or icing sugar (optional).

Cherie Kelly's Portugese Egg Custard Tarts (Pasteis de Nada) 葡撻


2013-08-07

Teddy Bear Chocolate Macarons ♥

I had wanted to make these cute little bear macarons, finally got some chance to make them now :) French Meringue method really helps piping the tiny ears out easily. I definitely will try make some other shapes/animals next time :-D

Cherie Kelly's Teddy Bear Chocolate Ganache Macarons


Cherie Kelly's Teddy Bear Chocolate Ganache Macarons

Little Bear Chocolate Macarons

Ingredients

For the macaron shells 

(makes around 40-44 macaron shells, 20 sandwiched macarons for each flavour)
90g grounded almond
120g icing sugar
a pinch of salt
75g aged egg whites
1/2 teaspoon egg white powder
75g sugar
Few drops of food coloring gel (colours of your choice, I used brown here)

For the chocolate ganache

125g best-quality milk/dark chocolate
90g whipping cream

For decoration

20g melted dark chocolate
20g royal icing/melted white chocolate

Methods

To make macaron shells

1. Put the grounded almond, icing sugar and salt in a food processor, pulse several times for a few seconds each to combine them. Sift them into a large bowl and set aside.
2. Whisk together the egg white and egg white powder on medium speed until soft peak.
3. Add the sugar gradually and keep whisking until the meringue is glossy and stiff. Add in the food colouring.
4. Fold the dry ingredients quickly into the meringue with a spatula, try to fold as less strokes as possible and avoid over-fold the mixture.

Cherie Kelly's Teddy Bear Macarons Piping Template
5. Spoon the 95% of the mixture into a piping bag fitted with a 2cm plain nozzle and pipe the faces onto parchment paper. You can print out this bear macarons piping template onto a A4 paper for your guide.
6. Put the remaining 5% of the mixture into a piping bag fitted with a small 0.5cm plain nozzle and pipe the ears touching the edge on the faces onto parchment paper.
7. Set aside for about 30 minutes or until a skin forms that does not stick onto your finger.
8. Bake the macarons in preheated oven between 160 degree for 15 mintues, rotate the tray 180 degree half-way during baking.
9. Remove the macaron shells from the oven and tray, place the parchment onto the work surface and let cool completely before removing the shells.

To make the chocolate ganache 

1. Break the chocolate into pieces and put into a bowl. Send to the microwave to melt for 60 seconds and stir until the chocolate completely melted.
2. Boil the cream and pour about a third at a time onto the melted chocolate, keep mixing and add in the extract until well combined.
3. Allow the ganache mixture to cool. Press clingfilm onto the surface of the ganache and refrigerate until thick enough to pipe.

To assemble the macarons

1. Spoon the ganache into a pastry bag fitted with a 1cm plain tip. Pipe a generous round onto a shell, then top with another shell, twisting lightly so that the filling spreads and bulges enticingly.
2. Gently pipe some royal icing or melted chocolate for the bears' eyes and mouths.
3. Store the macarons covered in the fridge for at least 24 hours to allow the inside of the macaron shells to soften.
4. Bring back to room temperature before eating.
Cherie Kelly's Teddy Bear Chocolate Ganache Macarons


2013-08-04

Puppy Royfert Lemon & Blueberry Cake

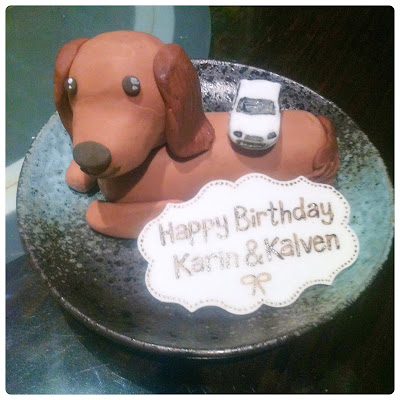
You remember this sausage dog Royfert? He appeared in the Millefeuilles Napoleons cake last year. Karin and Kalven had a joined birthday party this year, Clement asked if I could make a cake with their puppy Royfert :) last year I made him 2D, this year I wanted to make him 3D with chocolate sugarpaste.

Cherie Kelly's Puppy Dachshunds Royfert Lemon & Blueberry Birthday Cake


It is a lemon and blueberry cake with lemon curd buttercream frosting decorated with some meringue on the top. I made Royfert a bit too big, there was a mini Audi cake topper for Kalven on the side :-P Happy Birthday to Karin and Kalven again! hope you guys enjoyed the party last night xxx
Cherie Kelly's Puppy Dachshunds Royfert Lemon & Blueberry Cake

I have found a recent picture taken by Lawrence I referenced to, I like this the most because Roy looks very comfortable :-D